A friend once asked me for my opinions on the use of artificial intelligence. I’ve been a big fan of A.I. for most of my life, and it’s been a popular theme in science fiction. But now, we actually have credible A.I. in our social and commercial environment, and it’s time to address the elephant in the room.
Artificial intelligence is a tool, nothing more. One does not condemn a table saw because it can present more teeth to the plywood panel faster than a human could. Such assertions that it is somehow inherently evil are misguided and disingenuous at best.
Generative AI does depend on having been trained by observing the works of artists, and a great many of them. This, however, is also true of human artists, and we do not consider this theft or misappropriation. Those who present this notion as viable apply a double standard. The same is true of the written word. Generative AI learns by observing the work of others. It’s not a copy-paste machine. It does not now, and never has, worked that way, and those who imply that it is somehow “stealing the works of others” clearly do not understand how either artificial intelligence nor human creativity work well enough to make an intelligent comparison.
The areas where generative AI shines are the technical ones, writing code that runs, diagnosing complex networking issues, constructing database applications that perform specific tasks. It can also do miraculous things, like protein folding, and speeding the discovery of new, previously unknown materials.
That said, one does not just lay the wood on the table and press the button, hoping for a replica Louix XIV divan to come out the other side. It’s just a tool. It requires a human being to make the decisions as to where to cut, and why. Artificial intelligence is mostly useless when it comes to creative acts, for it cannot create, except under the express direction of a human being.
Those who rely on generative AI for their writing simply by typing a quick command and pressing a button have removed themselves from the equation, and presenting the output of generative AI as their own without any material guidance, in my view, are charlatans and cheaters. The same is true of those who use pushbutton AI to make images, and then presenting that image as their own work. There is a role for AI in image generation, but deceptively passing it off as one’s own creative work is an unworthy occupation.
The U.S. Copyright Office has clarified its stand on the use of A.I. in creative works. They have said that if A.I. is used as a tool to create elements used in the finished composition, that one may copyright such a work. But if the finished piece was created without the guidance of a human hand, it cannot be copyrighted, for machines may not author anything directly.
I use artificial intelligence when creating graphics, but almost never to create entire images. Instead, I do things like remove people or objects from images, or add missing features. I also use A.I. when coding, because frankly, most of what I have to do is grunt work, and my guidance to the A.I. comes in very precisely defining the task so that I get exactly what I want. It’s like talking to a very literal minded child. I also use it in my writing, but never to create whole works, only to analyze and to help me organize what I have already written. I have tried, a few times, to have it write things for me, but the results are always mud-dumb, lackluster or outright wrong. And, A.I., no matter how hard you try to set up meta rules to combat this, tends to tell you whatever the hell it thinks you want to hear. This is not useful behavior in a creative, critical environment.
As I see it, the primary ethical concern with ChatGPT and its ilk is the abuse of the service from the standpoint of people trying to take shortcuts with it, or claiming its output as their own. This can range, therefore, from merely being sloppy and lacking in thoroughness to being outright unethical.
Tools, in essence, are tools. There is nothing inherently good or evil about them. It is in no one’s interest to anthropomorphize it and assign it moral or ethical behavior on its own. It is what we make of it, nothing more.
So, take what you want from this view, but remember that you can’t just declare something to be true in defiance of fact or objective proof otherwise. See the situation for what it is, and plan and react accordingly. No other approach makes sense.
– 30 –
Did I make the header image for this article by pushbutton A.I.? I wanted something decent, and there had to be an image there, but I didn’t care much what. So yes. But I’m not claiming this as my artwork. It’s just generative graphics.
It’s that horrible “Three Bug” in WordPress menu systems. Most people are just unprepared for something so simple in normal daily use as a WordPress site admin to break in such a bizarre way. It turns out that this bug in WordPress is easily solved. I’m not sure exactly what causes it, but I do know what makes it go away, and it’s simple:
Your theme is trying to use a font that hasn’t been loaded yet.
To fix this, you’ll have to identify what font it is, then add a preload statement to your site’s header. In my case, I use Divi, so here’s what mine looks like:
<!-- Preloading font to fix menu icon flashing 3 -->

<link rel="preload" href="/wp-content/themes/Divi/core/admin/fonts/modules.ttf" as="font" type="font/ttf" crossorigin="anonymous">

<!-- Preloading font to fix menu icon flashing - end -->
You’ll have to have a theme that allows for special code to be inserted into your page header. The Divi theme does this natively, but for other themes you may have to add a header/footer insertion plugin.
So the Krypton Radio web site has to go full SSL now because most modern web browsers (read “Google Chrome”) won’t let people visit without warning them that your web site will slay your children in their sleep if you don’t have an SSL certificate on it.
This is frankly just Google messing with our heads, for the most part. A site that does not handle money shouldn’t have to worry about this. All the monetary things we need to do are handled by external sites that actually are secure. But I digress.
So our first assumption was that we could just buy a cert from secureserver.net, install it on Centova, Icecast and our main web server and we were probably good to go.
And then everything collapsed.
What We Did First
I went to create our private key and Certificate Signing Request. After a few tries, I finally was able to use CPanel to generate this, adding in wildcard domains for every domain we wanted to cover. This is a completely legal thing, and you can buy one certificate to handle as many domains as you want.
If you actually buy it through CPanel, though, you can’t. It’s one domain per cert, and $30 per cert. Buying it through your registrar, though, is a lot cheaper. If you own ten domains, you can easily spend a bundle doing this, and there’s literally no reason for it. Shall we spend 10% of the cost Cpanel wants us to spend?
Yes. Yes we shall.
Mind you, the only reason we’re doing that is that when we started all this there was no such things as Let’s Encrypt, which is a free secure certificate signing company.
The only catch to certificates you get from Let’s Encrypt is that the certificates expire after 90 days, so it’s kind of a problem if you want to use them with a mail server. Every three months your users will have to accept a new SSL certificate to get their email, and trust me, it wigs them out. Most people can barely operate the send button.
That Utterly Failed
No matter what we did with the certificates supplied to us by secureserver.net, Centovacast hated them. The installation script provided by Centova (your installation will tell you that the script lives at /usr/local/centovacast/sbin/setssl) just barfs on it every time.
The instructions provided by Centova say to get Apache credentials. This is wrong. You need credentials for something, but whatever it is, it wants a .pem file, and whatever is supposed to be IN that .pem file isn’t documented.
If you can get a .pem file, great – otherwise, you’ll have to do a massive workaround.
The Icecast Connection
So that’s when we figured out that Icecast, the Centova main panel , and WordPress all needed to be set up with certificates, and that not all of them were going to be able to use the same ones.
The authority chain from LetsEncrypt comes in in the chain.pem file as created by the Centova LetsEncrypt utility, and that’s stored in /usr/local/centovacast/etc/ssl/certs, and then from there there are directories corresponding to each domain. The fact that they bother to identify files by domain name teases the fact that may be possible to run Centovacast from more than one valid domain so long as the server answers to multiple domains.
To inspect the certificates being managed by CPanel, you need to log into your WHM panel and go to:
To do that, you need to set up a directory alias on a web server on the same domain as Centovacast to serve up the validation files Let’s Encrypt needs to prove that you’re who you say you are.
The instructions say to use a specific block of code to define the directory alias that points to where those validation files are held on the server, but it says nothing about where in your Apache file to put them.
You’re going to need to set up your aliased directory so that the same domain that handles your Centova server is being served as a regular domain or subdomain on port 80, which is the standard port for serving web pages.
In my case, I had a subdirectory called ‘station’. I had to create a server alias so that that subdomain was included in the list of other servers my main vhost listing handles for me, so that my Centovacast subdomain and my main one are really being handled by the same vhost. This saved me from having to set up a complete separate vhost just to handle this one fricking problem.
It also gives the incorrect code to insert in the first place. Forget what they say in their article. Here’s the correct code:
Alias /.well-known/acme-challenge /usr/local/centovacast/etc/ssl/acme-challenges
<Directory “/usr/local/centovacast/etc/ssl/acme-challenges”> Options Indexes AllowOverride None Order allow,deny Allow from all Require all granted
# Apache 2.x <IfModule !mod_authz_core.c> Order allow,deny Allow from all </IfModule>
# Apache 2.4 <IfModule mod_authz_core.c> Order allow,deny Require all granted </IfModule> </Directory>
Big question: Regarding the ‘setssl’ utility, why put broken code in a utility, and then write documentation that pretends it works? Again?
Centova is notorious for this.
When we fixed all of the above basic configuration with the Apache server to satisfy the needs of LetsEncrypt, we found that the setssl script was changing permissions on the target file folder such that it would return a 403 error.
That’s right, the Centova utility script that installs the certificate intentionally breaks the process so that it can’t finish.
Insert the change in the chmod instruction that alters it from 750 to 755.
For some reason this bug has been in there forever, and Centova’s never fixed it. They say the answer to this problem is to make the user that the Apache server runs under a member of the ‘centovacast’ group, but in my experience this didn’t work and I got a 403 error no matter what I did later.
Anyway, here’s the code to modify:
if [ ! -e “$challengepath” ]; then
mkdir -p “$challengepath”
fi
#(In later versions of the code, these two lines are missing entirely. If they’re present, make the change to the chmod parameter as shown).chown root.centovacast “$challengepath/$testfilename” chmod 0755 “$challengepath/$testfilename”
Once I patched my copy, I set the file permissions on it so that future Centova updates couldn’t revert my changes, like they did the last three times.
You’re Not Out of the Woods Yet
It’s not enough to get Centova itself running on an SSL certificate. Now you have to get IceCast itself working with SSL, which for some reason is a separate task, and any attempt to link to an unsecured stream from a secured site will make web browsers claim your site is not secure, thereby defeating the whole point of having a certificate in the first place.
So the trick here is, you will probably have to create a new listen socket beyond your default. Centova, by default, set you up on port 8000. I had to create a new secure port, so I moved it well up out of the way, on port 8080. All the mount points are available on both ports, but you can’t have one port be both secured and unsecured.
Your Icecast config isn’t called icecast.xml in a Centova installation. It’s called server.conf, and it’s also in a nonstandard location, which is /usr/local/var/vhosts/<your station name>/etc/server.conf.
Here are the listen socket sections from my server.conf. It’s the top one you’re looking at. The bottom one is the default definition, and the top one is the secure one. Centova does not support the direct creation of secure listen sockets, so you have to hack this by hand.
Then finally, you’ll have to add a line in your server.conf file that loads the required SSL certificate. If you’re running your Icecast stream and your Centova server from the same domain, you can reuse the same bundle.pem file, but there’s literally nothing stopping you from making a separate one for each individual Centova virtual host and putting each bundle.pem file in a separate place.
The line for your server.conf file looks like this:
Once this is done, you can go to the Centova interface and reload the server, and it will inhale the new settings. You can test them to make sure it worked by going to https://<yourdomain>:8080 and seeing if it loads. If it doesn’t, you’re still broken, but if it does, congratulations, you now have a secure stream on your internet radio station’s business end!
Except that that doesn’t quite do it.
So it’s /usr/local/letsencrypt/letsencrypt-auto renew,
then rebuild your Icecast PEM file, then use your modified setssl script:
and then after all that, you have to both restart centova, and then stop your Icecast instance completely and restart it before Icecast will use the new certificate.
Now you’re done.
What a fricking ordeal.
Use Azuracast instead
To be honest, a much better idea is Azuracast, which does everything Centova does, plus a lot more, does not require a monthly license, is open source and is being actively maintained. Centova is neither fully open source nor actively maintained.
I’m on an Ender 3 support group on Facebook, and nearly all the comments in this group asking for help are from people who did not follow the instructions when doing the setup on their Ender 3’s in the first place. Those who are meticulous about getting the frame absolutely square and the belts as tight as they can get them without binding everything up are getting superior results.
If you’ve just bought an Ender 3, there are a few things you’ll probably want to do or try at some point.
Make sure your frame is square. I’m serious. 90% of the problems you’re likely to have with your prints will derive from not having properly assembled the gantry.
Make sure your bowden tube is properly trimmed (and by this I mean trimmed off exactly square) and then fully inserted into your hot end. This one error will make your life hell. If you don’t get this exactly right, you’ll get plastic plugs where your filament heats up and jams your bowden tube, requiring you to partially disassemble your hot end and possibly trim back your bowden tube to get past the clog. Having the bowden tube properly trimmed and properly inserted mostly stops this from happening. There are “fixes” to get around the clog problem, but in general they just add additional points of failure and rarely work as well as setting up your bowden tube properly in the first place.
Replace the plastic extruder clamp with a metal one. Some printers have an extruder arm made entirely of plastic. They’re cheap, usually under $20, but the filament tends to saw through the plastic clamps over time. Sooner or later you’ll want to replace it. Newer ones have a brass liner in there that stops the filament from doing that.
If your printer has to live inside, get a silent controller board. This makes your printer so quiet that you’ll have to do an eyeball check to see if it’s still even printing, it’s so quiet. They’re about $40. However, these silent boards can also prevent you from making linear advance calibrations that can improve the quality of your prints, so you may find yourself with a choice of quality versus machine noise while printing.
Print a fan cowling for your CPU box to keep crap from falling into your controller box through the vent fan. Newer Ender 3’s have the vent on the bottom of the controller box, so it’s not a problem – but the older types have the slots on the top. It’s amazing how much crap can fall in there.
Print a muffling fan cowling for your power supply box. This will drop the fan noise made by the machine by half. Be careful – doing a poor job reassembling your fan with its new housing can make it worse, not better.
Order more bowden tube, and more nozzles, and more pneumatic clamps. These things wear out, and after about four to five months of use, they’ll start to screw up your prints. You do not want to be stuck without spare parts if you’re in the middle of a paying print job and something breaks.
Get a glass build plate. Go to your local dollar store, and buy a cheap 9×9 square picture frame. Take the glass out of it, and throw the rest of the frame away. The picture frame glass is a quarter the weight of the official Creality glass bed and causes far fewer problems with Y-axis ringing due to its much lower inertia. Alternatively, go to IKEA and get a 1′ mirror tile, then go to your local home improvement store and get a glass cutter so you can cut the mirror tile down to the size of your printer’s bed. If you’d rather use the Creality build plate, don’t be afraid to flip it over and use the untextured side. It’ll leave a mirror-smooth bottom surface on your parts!
Don’t use tape on your print bed. Tape is a substitute for proper bed leveling, and solves problems that haven’t existed since the introduction of heated, adjustable beds. The only time you might want to use it is if you’re using something other than PLA in your printer that sticks like mad to your printing surface, such as PETG. The tape will let you remove the part without breaking your glass.
If you’re having particular problems getting your PLA to stick to the build plate, try a fine mist of Aquanet. It’s cheap, and compared to fiddling with the bed leveling to get it precise to the last 0.01mm, it’s a fast solution that gets you on your way and printing parts again. Some purists think this is cheating, because you can resolve sticking issues with better bed leveling, but if you have to get the parts out the door, there’s nothing wrong with doing something quick that works so you can get on with your life.
If it feels stupid, but it works, it’s not stupid.
Buy eSun PLA+ filament for printing. It runs about 10° C hotter than the usual stuff, produces much more precise, clean prints, and costs exactly the same as whatever you’re using.
Don’t grind your filament to death. One of the things that can happen if you try to drive your printer too fast, is that you can exceed the structural integrity of the filament as it passes by the gear in your extruder. If the extruder can’t feed the filament through the print head fast enough, it’ll start digging a hole in the side of the filament at the extruder head, and then you are basically and royally screwed, and your print has failed.
If you think vibration damping is something you need, buy a $5 yogo mat, cut it into 1 foot squares, and put a stack of four or five squares under your printer. It will kill a lot of the noise and vibration your printer makes, and may well improve the quality of your prints.
Make sure your belts are as tight as you can get them. Don’t worry, you won’t break them. Tight belts means more precise motion and better prints.
Experiment with printing at stupidly thin layer heights. I started experimenting with 0.08mm layer heights, and people I show the prints to, even other 3d printer owners, are amazed that these are 3d printed objects.
Special fan housings generally do very little, and on the whole don’t improve print quality enough to bother with. Minor tweaks in your slicer settings usually have a much broader effect.
It is possible for an Ender 3 to not want to print because it’s too cold to start with. If your printer lives in the garage or workshop, as mine does, it’s probably not in a heated environment – and that means that it can get down to under 10°C and chill your temperature sensors to the point where the printer’s firmware thinks something must be broken, and you’ll get a MINTEMP error. You could have a bad thermister, or a bad connection trace to it on the motherboard, or a bad connector, but the first thing to try is just bringing the thing inside and letting it warm up a bit. I did this and once I got the temperature of the printer up above about 8°C, the printer realized its sensors weren’t broken, and it started right up.
Get a Raspberry Pi and load it up with a webcam and Octoprint. Being able to run your printer without having to be in the same room with it is heaven. Being able to move your printer to your garage or workshop is even better.
Having trouble with weird surface artifacts in your prints?Slow down. This is especially true of specialty filaments like silks or silk metallics. They are extremely sensitive to print speed, and what looks like a hopeless print may come out perfectly if you cut the print speed in half.
Have to paint your prints, but don’t like the way the parts smell afterwards? Sometimes the client wants it painted, and it’ll smell bad for quite a while once you do. White vinegar will get the smell out of the painted surfaces while not endangering the finish. Be sure to rinse off the white vinegar, or your parts will smell like vinegar instead of paint.
Don’t bother with vibration damping feet for your printer, or special angled mounting arms for your filament spools. By in large these do nothing but waste your time and materials. (If you need to make angled printer arms so that you can fit the spool and printer into a more compact space, that’s a different problem, and you should have no qualms about doing it.)
Octoprint suddenly won’t connect to your 3d printer? It could be the USB voltage levels. What’s happening is that it matters what order you connect your printer to your Octoprint device. If you turn on your Raspberry Pi and plug it into your printer before your printer is powered up, the motherboard in the printer will draw just enough power to make the voltage levels required to detect your printer as a USB device too low to actually do the job.
The fix is to disconnect the USB cable, power on the Octopi and the printer separately, and once you’re sure the Octopi is booted, then and only then connect the USB cable between the Pi and the Printer. Now the Pi will be able to detect the printer as a USB device, and all will be well.
Check back here periodically. I’ll be updating this list of tips as I go, and you may find out something new you didn’t know before.
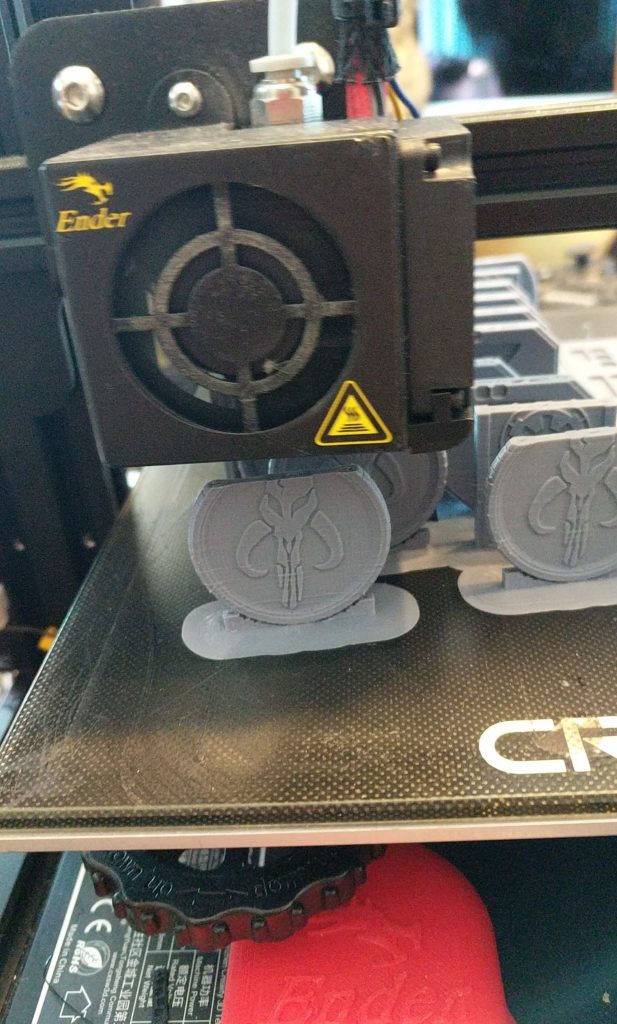
September saw the arrival of a new Creality Ender 3 3d printer at the Krypton Radio head office. The intent was to create new things to offer as station swag and perhaps create a new line of bespoke merch, something along the lines of props and costume pieces that people might want to buy from us.
I’ve been having a blast with it, and I’m trying to find new ways to use it that will benefit the company and myself. It’s a new creative tool I can use to bring daydreams into the real world.
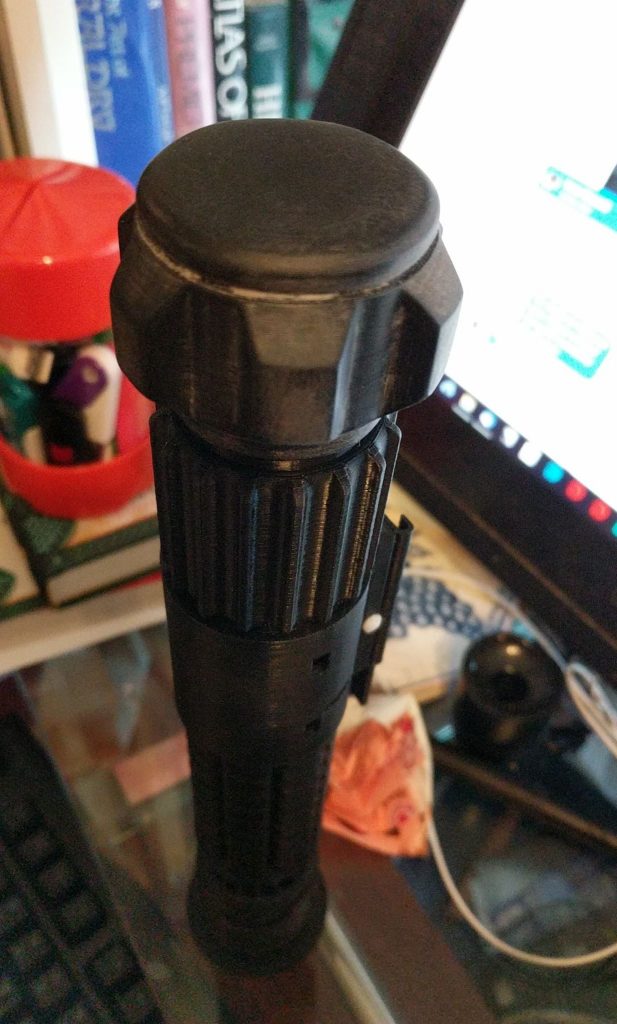
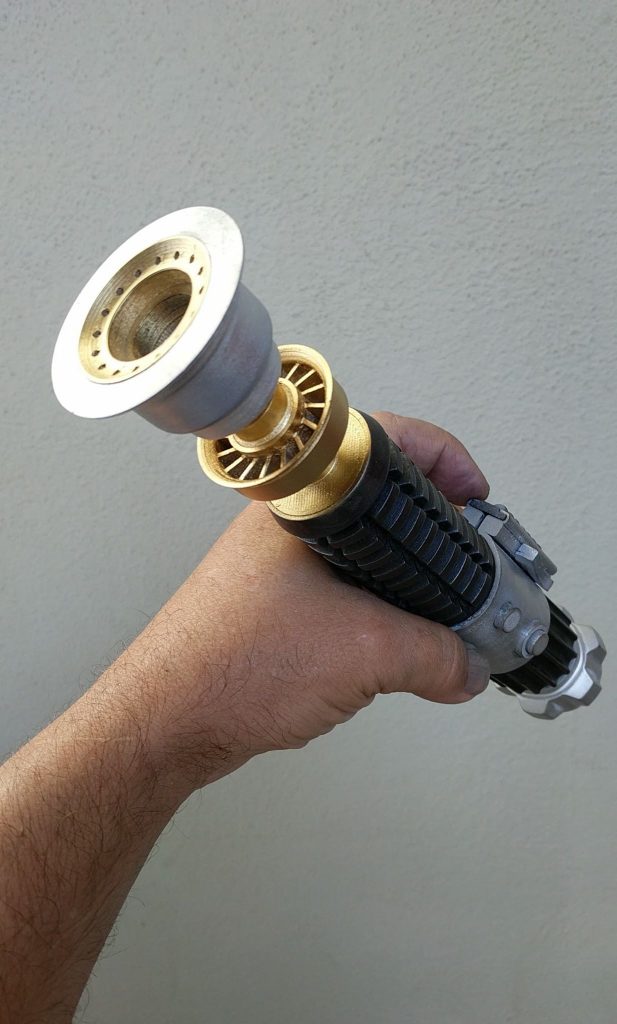
The Lightsaber
I’d always wanted one of these, from the first time I saw one in 1977’s Star Wars, but the goal had always been out of reach. I printed one. This is the one carried by Obi-Wan Kenobi in the first Star Wars movie. 3d printers print in layers, so there are layer lines. You just sand the heck out of it and hit it with primer, and you’d never know it was 3d printed.
I’m working on modifying this one to add electronics to it, but I may just go with a completely different design, one that already supports the idea of adding a blade.
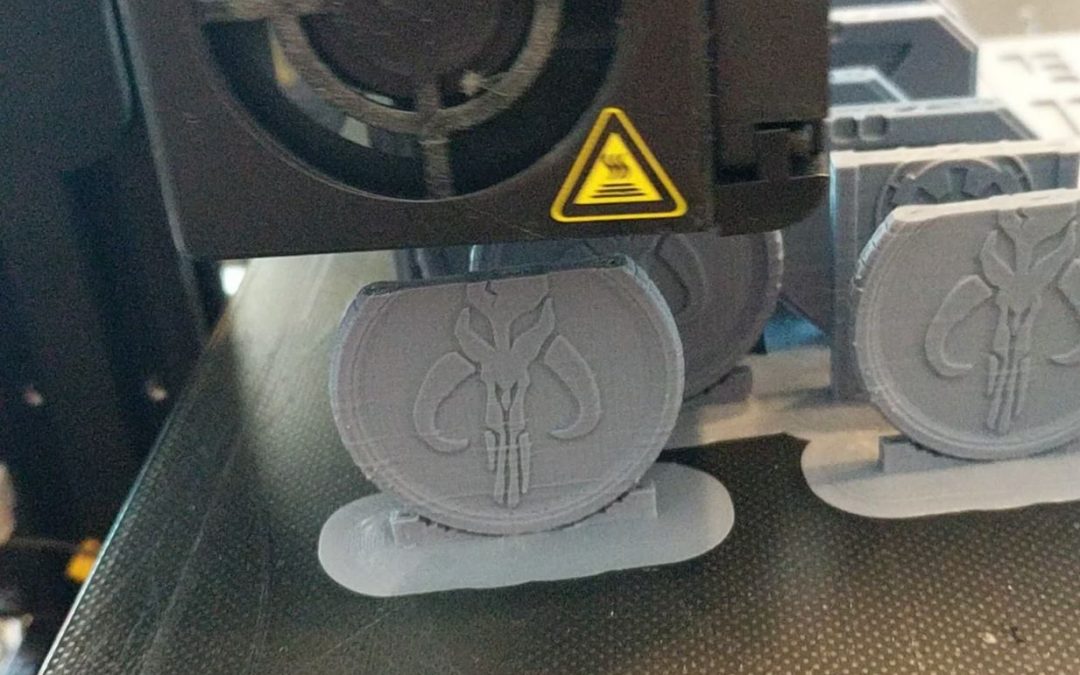
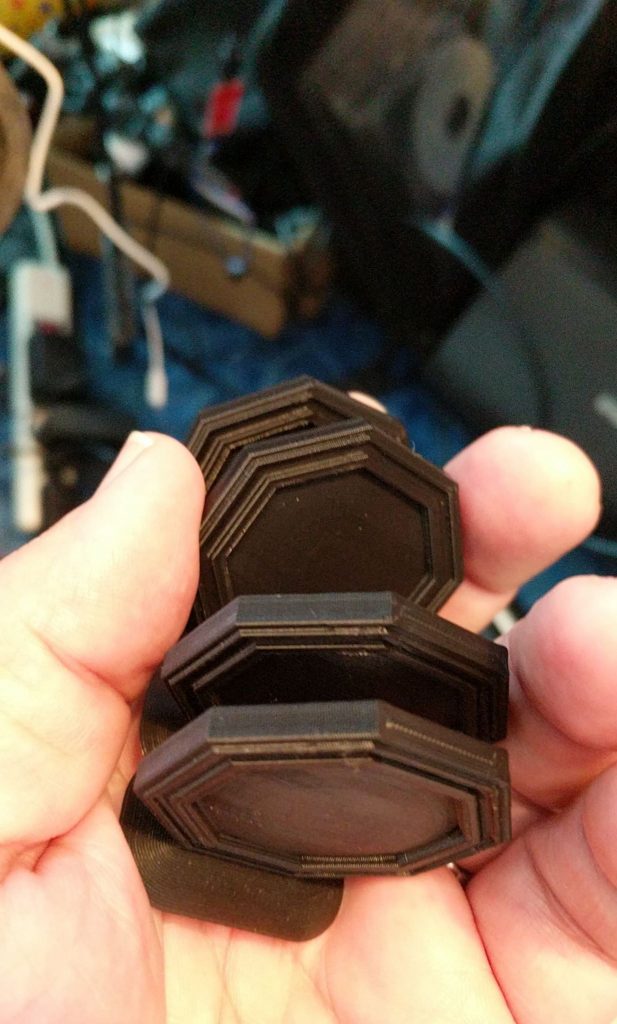
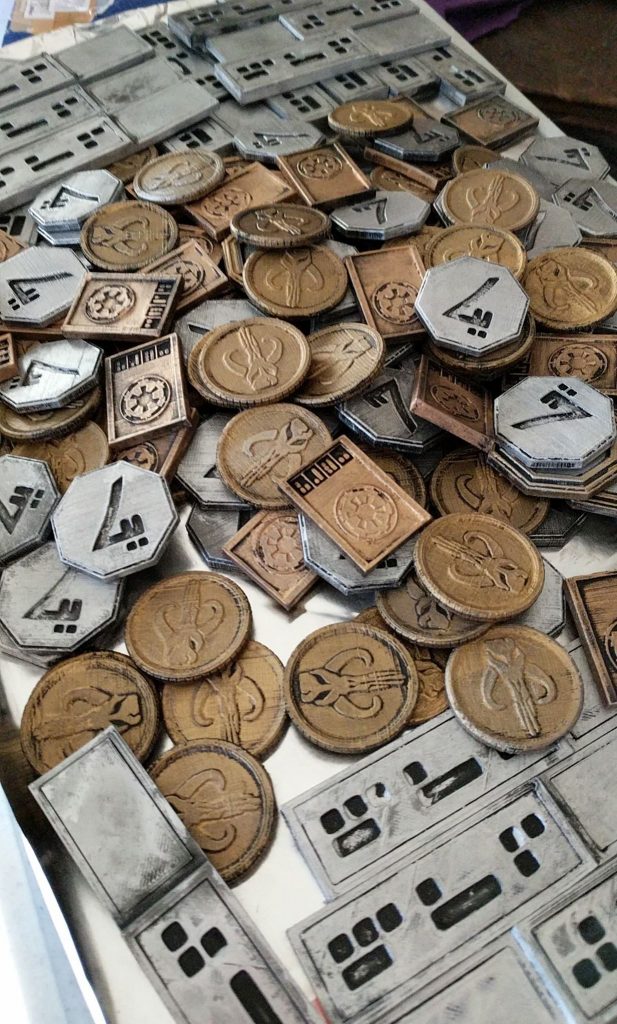
Sabacc Gambling Coins
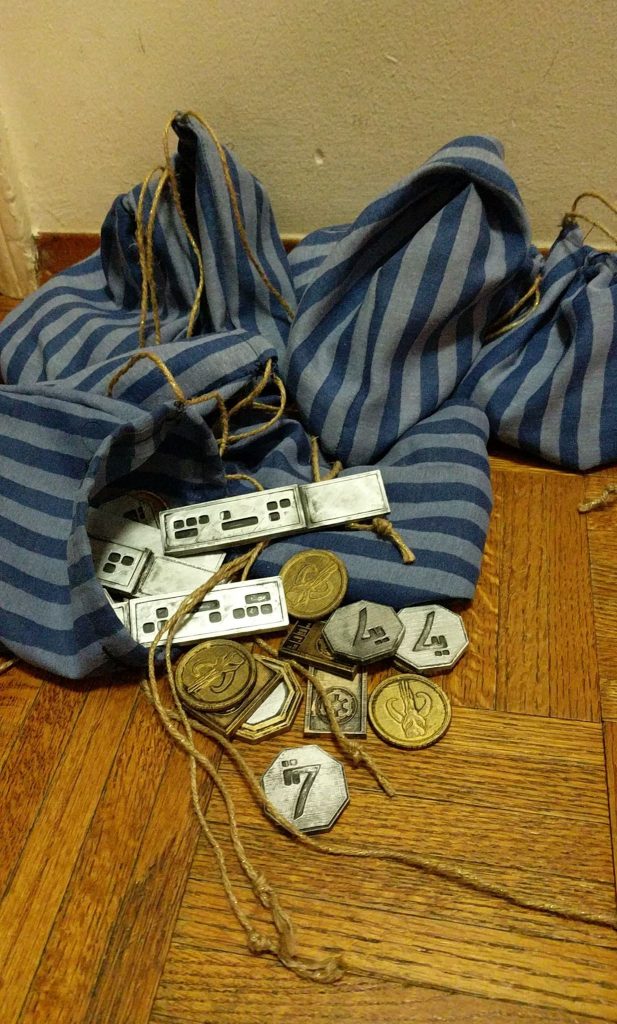
These replica coins from the movie Solo: A Star Wars Story were printed in black PLA, like the light saber, then painted with black primer, then I added Rub’n’Buff. I hand-sewed a bunch of bags and put 18-20 coins in each one, and gave them to friends and family when we went to Disneyland’s Galaxy’s Edge last month for Life Day on November 18.
My friends and I had a lot of fun giving them to cast members and watching their reactions, which ranged from gratitude to amazement.
I later found out that the Imperial credits were about half-sized, so I’ll be fixing that on future batches, but having bags of these was really something. I looked for a sabacc deck in the shops while I was there, but none of them had the decks in stock.
The Antikythera Mechanism
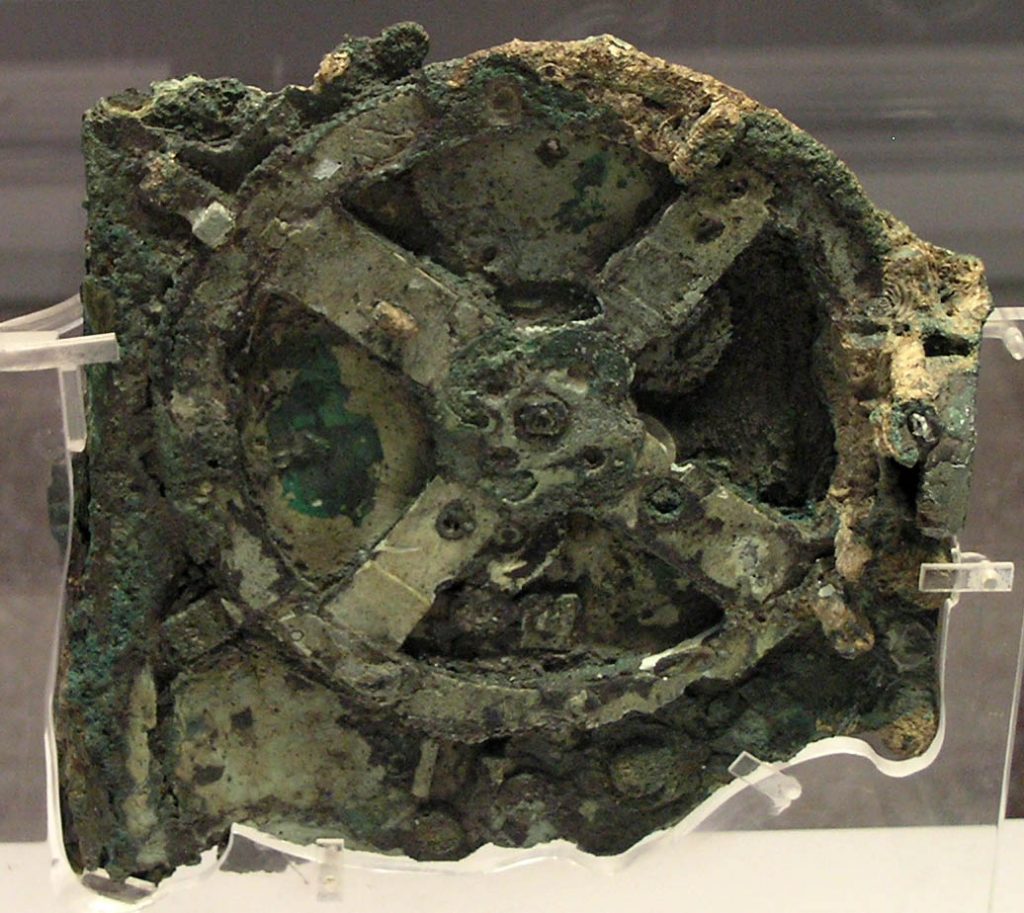
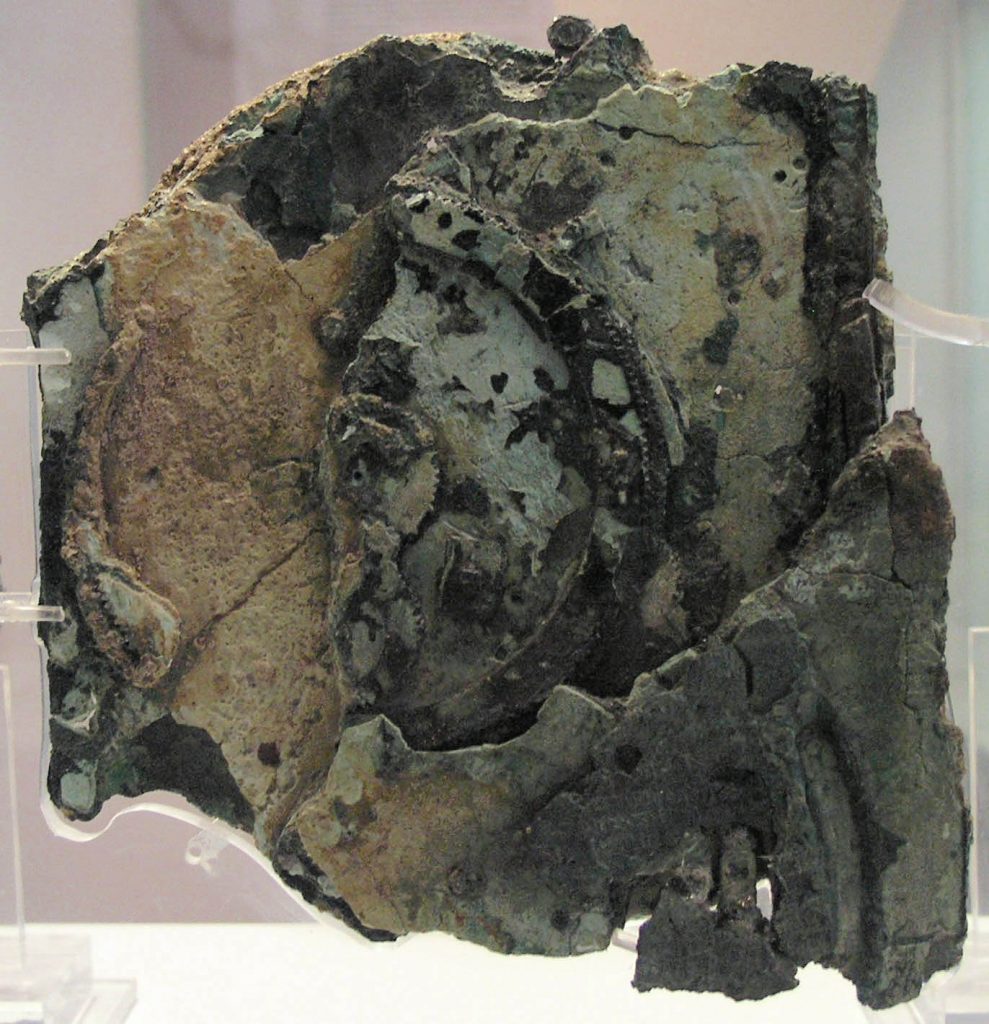
The Antikythera mechanism is an ancient Greek analogue computer used to predict astronomical positions and eclipses for calendar and astrological purposes decades in advance. It gets its name from the Greek island off the coast of which the device was found. It was fished out of the sea in 1901, and assumed to be some kind of archeological mistake – it couldn’t possibly be from ancient Greece, could it? They didn’t have computers – or did they?
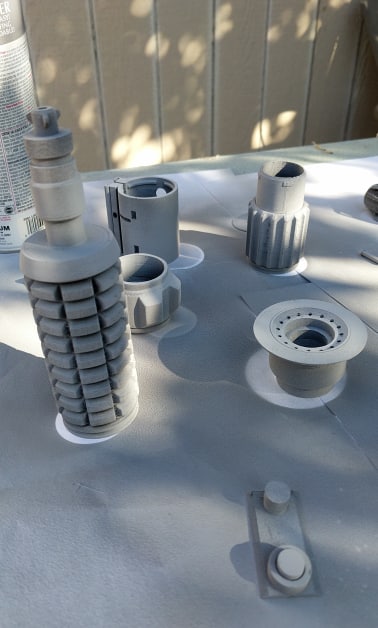
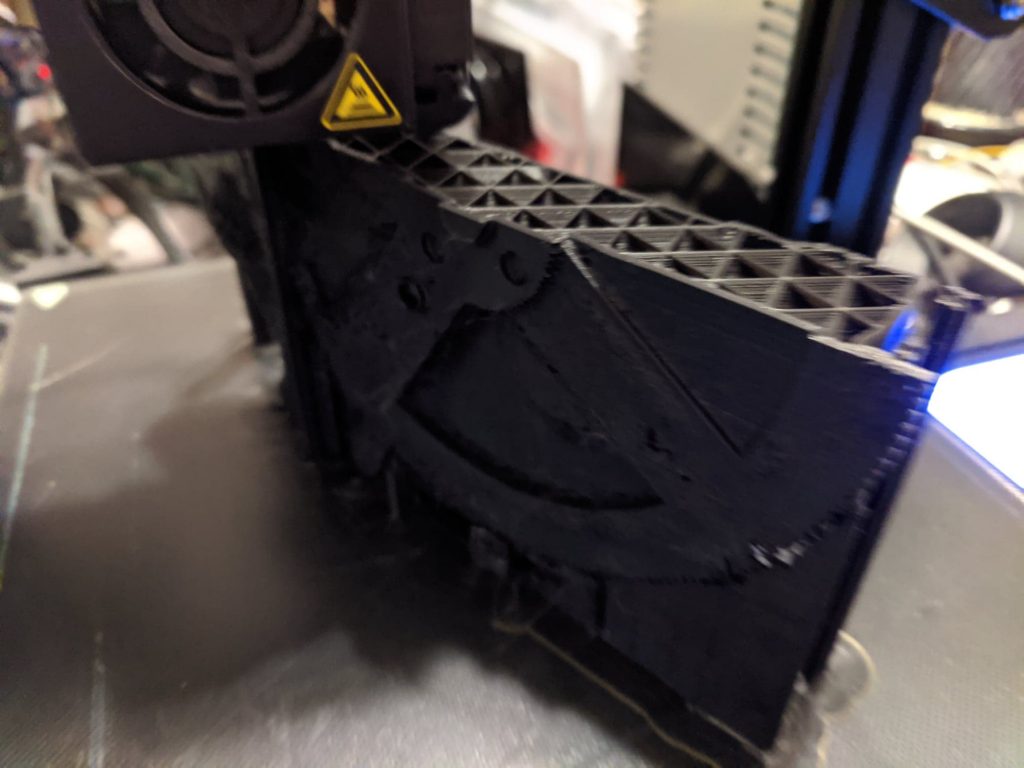
The largest piece is this one. It’s about eight inches wide, and seven inches tall, something around there. That’s what I’m currently making.
The instrument is believed to have been designed and constructed by Greek scientists, and was made sometime around 70-60 BC. It was housed in a wooden box, about 13.4″x7.1″x3.5″, and they know this because they found bits of the box around it. After conservation, it came apart into 82 separate fragments, four of which contain gears, like this largest piece.
The Antikythera Mechanism originally had at least 30 meshing bronze gears, and up to 37 gear wheels that helped the device keep track of astronomical bodies like Mars, the Sun, and the Moon. It could predict eclipses, and could tell you when the next Olympic Games were going to be. It was extremely accurate as well, correctly reporting subtle variations in the lunar orbit, for example.
The device, housed in the remains of a 34 cm × 18 cm × 9 cm (13.4 in × 7.1 in × 3.5 in) wooden box, was found as one lump, later separated into three main fragments which are now divided into 82 separate fragments after conservation works. Four of these fragments contain gears, while inscriptions are found on many others. The largest gear is approximately 14 centimetres (5.5 in) in diameter and originally had 223 teeth.
All known fragments of the Antikythera mechanism are now kept at the National Archaeological Museum in Athens, along with a number of artistic reconstructions and replicas of the mechanism to demonstrate how it may have looked and worked.
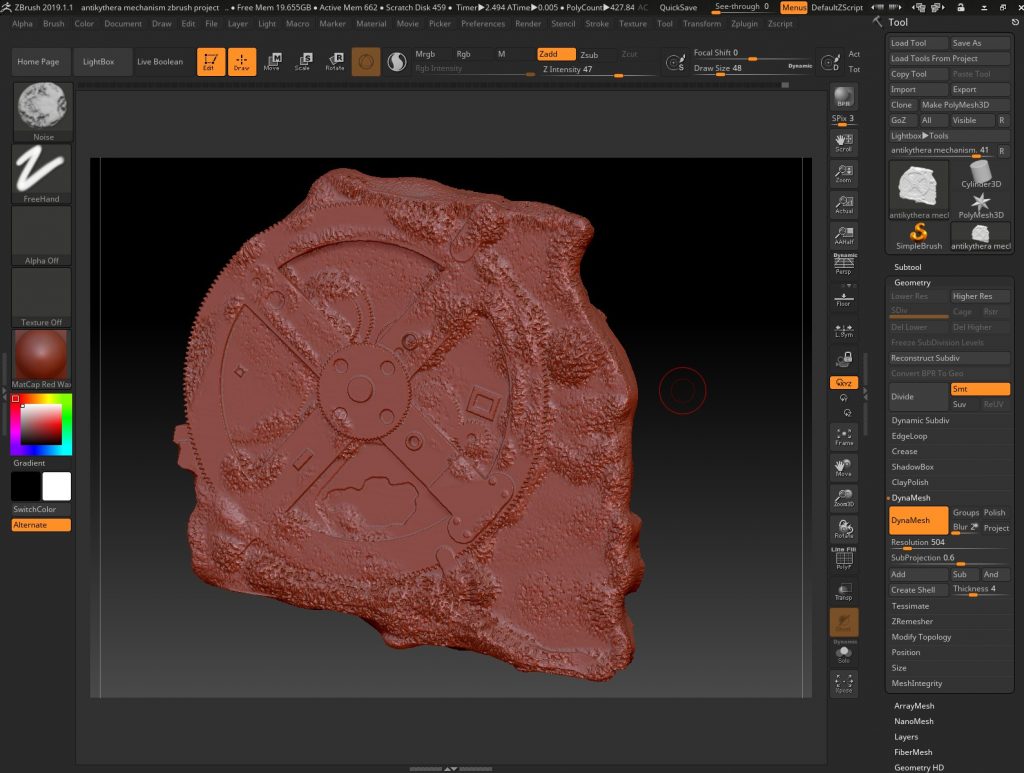
My version started as Cosmo Wenman’s rough layout model of it, about the right shape, but with technically accurate placements of the bronze gears and metal features. Wenman’s finished version makes use of a lot of post-printing texturing and paint, but I brought it into ZBrush and added corrosion detail geometry before sending it to my printer, so a lot of the details on mine will be already there when the printing is done. That will will take two and a half full days on my Ender 3 3d printer.
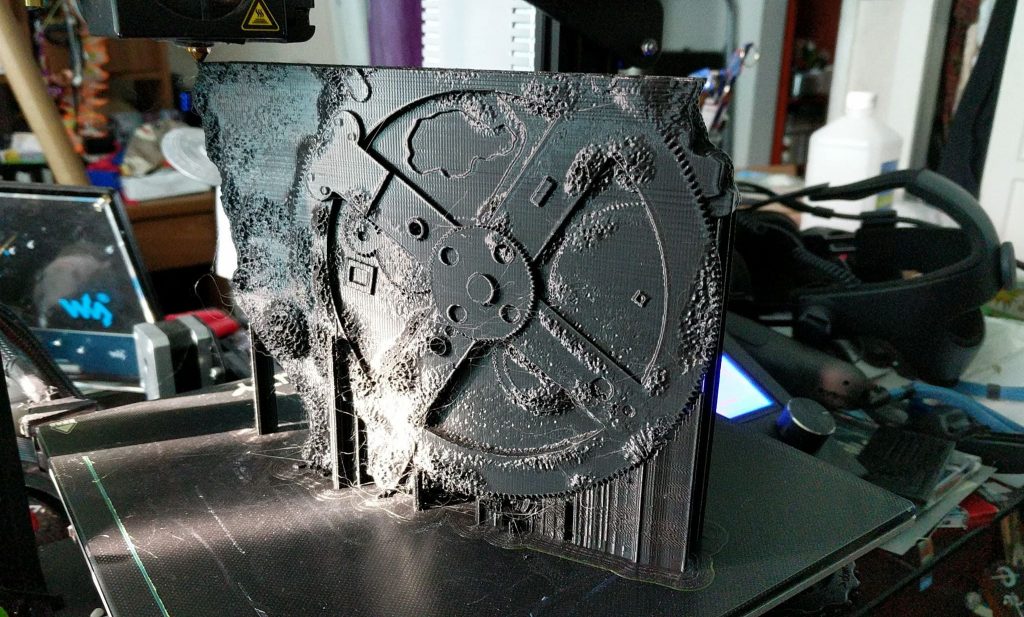
I thought for a while that my version might be too big, but I took a quick measurement of the main gear while it was on the printer, and yeah, it does look like it’s about five and a half inches across, meaning that the size of my replica artifact is probably pretty close to the real thing.
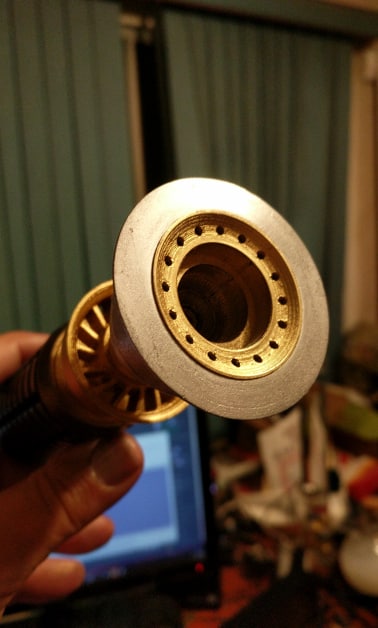
Once it’s done, it gets a little cleanup with a brush to remove tiny filament strings, artifacts of the printing process. Then it gets painted, and I have purchased an artist’s airbrush and compressor for the purpose. Whatever details that didn’t make it into my sculpt I can probably fudge with paint. I figure once I get going it will take about a full day to paint it properly.
The lighting here shows off the printing artifacts on the surface are going to be sanded off. There’s a lot of handwork to go before I can put any paint on this, and only a few days to go before I deliver it.
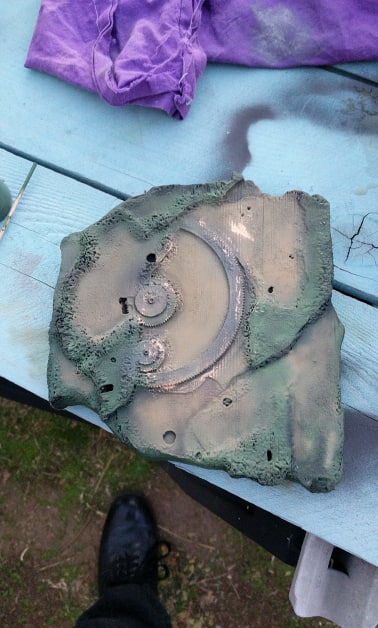
Rather than sand it all down, I used acrylic sculpting medium instead and just filled in the raster lines from the printing. Then I painted it all flat black, then airbrushed it and added some finishing touches of Rub’n’Buff to make some of the details pop. My airbrush work is – well, I need a ton more practice, let’s put it that way.
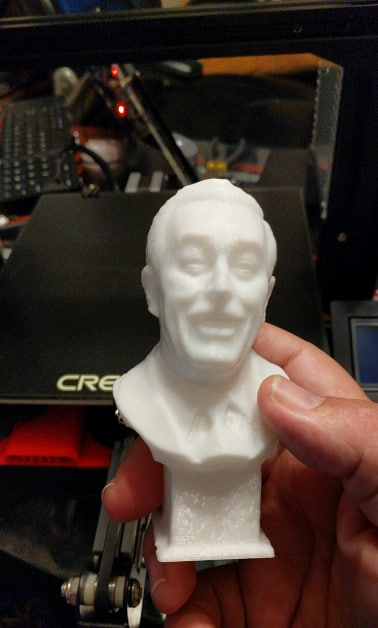
Walt Disney
At Disneyworld in Orlando, Florida, there is a sculpture garden decorated with bronzes of famous Disney characters. One of them is a bust of the great man himself. Somebody took a 3d scan of it, and converted it into a geometry file, and being the fan of his work and the man himself as I am, I had to print a copy of it.
One of these days I’m going to print a really big one. The model is actually a lot better than the resolution of my printer can cope with at this size. Still, it’s gorgeous, and I’ve given away three copies of this thing to my Disney-fan friends so far.
I’m sorry you’re not still here, Walt, The world could use you. I’m doing my best to try to follow in your footsteps, but I’m not doing it very well, I’m afraid. I just don’t have the reach you did – but that doesn’t mean I’m going to stop trying. The world needs every bit of magic we can muster.


Recent Comments